Taken from oppracing.
A Simple Overview of the Radial Master Cylinder mechanism
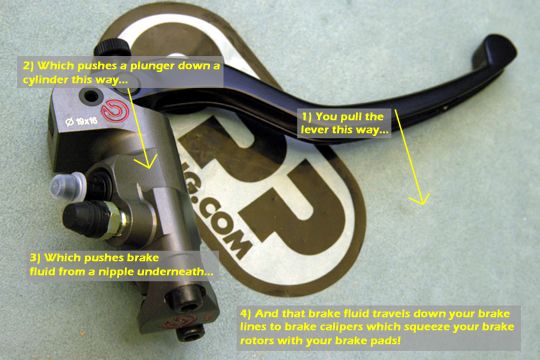
In this overview, we will examine the different features of a lever and break it down. But before we start, let's figure out how a radial master works in a really simple diagram...
Ok, to sum up this diagram, you pull the lever towards you and it pushes a plunger through a cylinder. That plunger squeezes out brake fluid out of the cylinder, down your brake hoses and into your calipers. The brake fluid in the calipers push the brake pads into the rotors, causing them to grab onto the brake rotors, thus causing you to slow down or stop.
Hey, let's stop and take a look at this lever design - it'll explain why most aftermarket master are radial. Notice the direction of the plunger and the direction that the lever travels. With a radial master cylinder, the plunger travels in the same direction as the lever. In a "conventional" master cylinder, the plunger actually travels perpendicular (or pretty close to perpendicular) from the direction of the lever. It makes sense that you can get a better feel for the lever if it's going in the same direction as the piston and plunger (radial) rather than going off on some funky angle (conventional). This is the main advantage of the radial design.
Understanding the Features of a Brembo Master
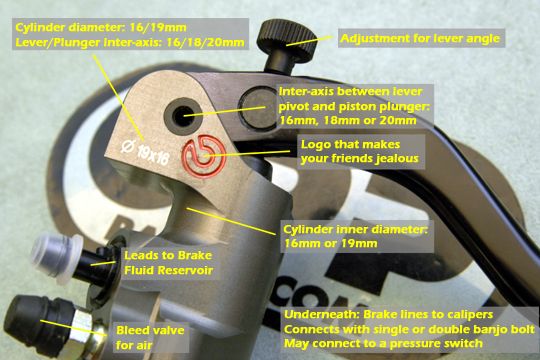
Now that we have a basic understanding of a master cylinder, let's look at the important stuff to know about a Brembo master. We can figure out most of the important stuff by the name of the lever. As an example, we'll use a 19x16 Billet Non-Folding Radial Brake Master Cylinder...let's look at the picture below:
Example: 19x16 Billet Non-Folding Radial Brake Master Cylinder
19x16: This specification indicates two values. The first value is the diameter (ie. bore) of the cylinder in millimeters - it is usually 16mm or 19mm. In this case, the diameter is 19mm. The second value is the inter-axis (ie. distance) between the lever's pivot point and the plunger that pushes into the cylinder - it is usually 16mm, 18mm or 20mm. In this case, it's 16mm.
Now that we know what the numbers are, let's figure out what they mean in terms of braking performance. When you are selecting a master, you need to understand that these values trade-off braking sensitivity and braking power.
For the cylinder diameter, as that value increases, you increase your feel and decrease your braking power. As you increase the diameter, you increase your cylinder size and increase the volume of brake fluid that you have to compress. This creates a dampening effect that allows you to better modulate the amount of brake pressure.
For the inter-axis value, as that value increases (ie. the distance gets longer), you are increasing your sensitivity and decreasing your brake power. As you move that plunger further away from the lever pivot, you reduce your leverage. I don't want to get into the technical aspect or into the physics of it...that's not the goal of this article. If you feel like you need to know more, I would recommend you search Google or How Stuff Works. Just know that if you increase the inter-axis value, you increase feel and reduce braking power. Likewise, if you decrease the inter-axis value, you increase your braking power and reduce your feel.
When we put these two values together, we can figure out which master cylinder specification results in the most braking power or the most feel. With a 19x16 master cylinder, you get maximum braking power and the least amount of feel. Vice versa, the 16x20 master cylinder yields the greatest amount of feel and the lowest amount of braking power.
Billet: Master cylinders are manufactured using two processes and are designated as either billet or forged. A billet master is cut from a solid block of aluminum using a CNC machine. This machine is computer-controlled and can carve out masters to very precise tolerances. A billet master is very precise but also very expensive to manufacture. A forged master created by heating a blob of aluminum (known as an ingot) to a temperature where it is malleable (but not a liquid) and pressing it into a mould to form the final shape. (It's different from casting where the metal is heated into a liquid state and poured into a mould.) The forging process is relatively crude and may have imperfections such as air bubbles or rough surfaces. A forged master is not as precise or refined as a billet master but is much cheaper to manufacture.
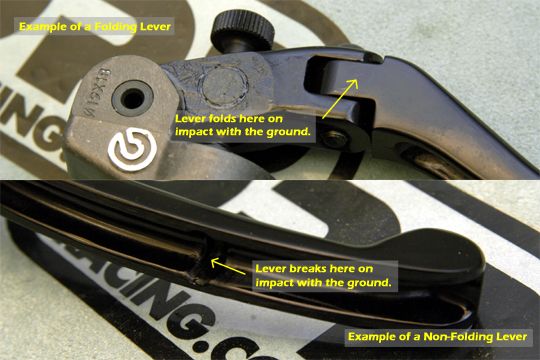
Non-Folding: Brembo masters are designed to absorb crash damage in one of two ways. The first method is through a folding lever. This lever has a hinge in it which allows the lever to swing up or down in the even that the motorcycle gets dumped. The second method is through a cut in the end of the (non-folding) lever. This is a deliberate weakness in the lever design - the lever breaks at the cut and absorbs energy. Sure, you end up with a broken lever but at least you still have part of a lever so you can use it to ride home. If you look at footpegs for rear sets, you may see the same idea at work. Breaking a lever is an easy replacement. Breaking the master cylinder means you have to replace the whole thing...not too good if you've invested in a Brembo.
To illustrate the differences, check out the picture below:


